

使用IntelliJ IDEA 12的Android UI Designer輕鬆寫Android App
六月底時JetBrains公佈了Android UI Designer將於IDEA 12現身(Android UI Designer Coming in IntelliJ IDEA 12),這幾天剛好有個空檔,就下載來試看看,同時練習一下Android的程式設計。以下是測試的步驟說明。請注意,因為IDEA 12仍在開發尚未正式釋出,錯誤難免且記憶體耗用尚未優化,請帶著耐心使用;即使IDEA 12仍為Alpha版,其出色的設計與Android UI的方便操作仍令人驚豔。
本文章的Android程式係參考網站深入淺出 Android -- Google 手持設備應用程式設計入門的教學來完成,此網站適合新手入門。
- 由developer.android.com下載Android SDK環境並下載要使用的SDK版本,例如Android 4.0.3(API 15)。

- 由JetBrains EAP(Early Access Program)網站下載IntelliJ IDEA 12最新試用版。請務必下載今天(8月9日)下午剛更新的最新版,先前版本有時突然會有「Package R does not exist」的錯誤,導致系統無法編譯。
- 安裝ideaIU-122.29.exe到C:\IDEA12,再安裝Android SDK到C:\IDEA12\Android。執行C:\IDEA12\bin\idea.exe或idea64.exe(Windows 64-Bit OS)。
- 在啟始首頁點擊【Create New Project】以建立專案環境。
- 在New Project對話窗點選【Create project from scratch】。
- 在New Project對話窗輸入專案資訊:【Project Name】輸入BMI,【Select type】點選【Android Module】,指定要建立Android模組。
- 在New Project對話窗輸入Android模組資訊:【Android SDK】選擇下載好的SDK版本,【Target Device】點選【Emulator】,選取Android設備模擬器為【MyAdv0】,再點擊其右側的〔...〕按鈕,在AVD Manager.exe視窗建立MyAdv0,並按Start啟動之。
- 指定Android的Java程式存放於src子目錄,左下方會顯示完整路徑。
- 所有設定輸入完畢,開始產生本專案需要的檔案。產生出的資料夾與檔案有幾個比較重要:res/values/strings.xml(存放對照字串資料)、src/com/example/BMI/MyActivity.java(主要的啟始程式)、res/layout/main.xml(畫面佈局資料)。
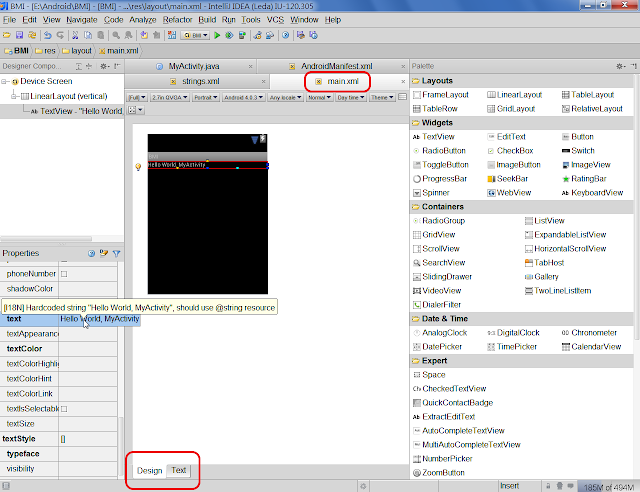
- 將步驟9提及的幾個檔案都打開,點擊main.xml便會看到Android設備的模擬螢幕。左上方是置放到螢幕的元件,左下方是元件的屬性,中間是模擬螢幕,其左下方有【Design】與【Text】頁籤,按【Text】就會顯示XML內容,最右方是Android的各式GUI元件。在模擬螢幕上將預設的「Hello World MyActivity」元件刪掉。
- 元件的使用方法:點選要使用的元件後,將游標移到模擬螢幕(注意:不是使用拖拉操作),模擬螢幕會顯示元件的擺放位置(Left、Center、fill_parent等),顯示fill_parent時按左鈕一下就能將元件放上。
- 依深入淺出 Android -- Google 手持設備應用程式設計入門的教學建立下列元件:


| 順序 | 元件類型 | id | text | strings.xml裡的值 |
|---|---|---|---|---|
| 1 | TextView | @striing/txtHeight | 身高 (cm) | |
| 2 | EditText | @+id/edtHeight | 另設定numeric=integer | |
| 3 | TextView | @striing/txtWeight | 體重 (kg) | |
| 4 | EditText | @+id/edtWeight | 另設定numeric=integer | |
| 5 | Button | @+id/btnCalcBMI | @string/btnCalcBMI | 計算 BMI 值 |
| 6 | TextView | @+id/txtResult | @string/txtResult | 你的BMI值是: |
| 7 | TextView | @+id/txtSuggest |
元件放置好後,在左下方的屬性欄位裡找到【text】,輸入上列表格裡的text值,再按其右側的〔...〕按鈕→再按【New Resource】,於彈出的對話窗裡建立Resource的名稱與其值。預設的Resource檔案是res/values/strings.xml。

13. 如果是以main.xml的文字編輯來直接輸入元件資訊的話,可以善用IDEA的〔Alt〕+〔Enter〕功能,讓IDEA自動建立缺少的Resource。


元件拉好後,開啟strings.xml,其完整內容如下(程式裡會使用計算後的建議,因此另外再輸入txtAdvice_light等3個Resource):
<?xml version="1.0" encoding="utf-8"?>
<resources>
  <string name="app_name">BMI</string>
  <string name="txtHeight">身高 (cm)</string>
  <string name="txtWeight">體重 (Kg)</string>
  <string name="txtCalcBMI">計算 BMI 值</string>
  <string name="txtResult">你的BMI值是:</string>
  <string name="txtAdvice_light">你該多吃點</string>
  <string name="txtAdvice_average">體型很棒喔</string>
  <string name="txtAdvice_heavy">你該節食了</string>
</resources>
14. 開啟MyActivity.java,輸入下列內容:
package com.example.BMI;

import android.app.Activity;
import android.os.Bundle;
import android.view.View;
import android.widget.Button;
import android.widget.EditText;
import android.widget.TextView;

import java.text.DecimalFormat;

public class MyActivity extends Activity {
  private Button btnCalcBMI;
  private EditText edtHeight;
  private EditText edtWeight;
  private TextView txtResult;
  private TextView txtSuggest;

  /**
   * Called when the activity is first created.
   */
  @Override
  public void onCreate(Bundle savedInstanceState) {
    super.onCreate(savedInstanceState);
    setContentView(R.layout.main);

    findViews();
    setListeners();
  }

  private void findViews() {
    btnCalcBMI = (Button) findViewById(R.id.btnCalcBMI);
    edtHeight = (EditText) findViewById(R.id.edtHeight);
    edtWeight = (EditText) findViewById(R.id.edtWeight);
    txtResult = (TextView) findViewById(R.id.txtResult);
    txtSuggest = (TextView) findViewById(R.id.txtSuggest);
  }

  private Button.OnClickListener calcBMIListener;

  private void setListeners() {
    calcBMIListener = new Button.OnClickListener() {
      public void onClick(View v) {
        DecimalFormat nf = new DecimalFormat("0.00");
        double height = Double.parseDouble(
            edtHeight.getText().toString())/100;
        double weight = Double.parseDouble(
            edtWeight.getText().toString());
        double BMI = weight / (height * height);

        txtResult.setText(getText(R.string.txtResult) +
            nf.format(BMI));

        //Give health advice
        if (BMI > 25) {
          txtSuggest.setText(R.string.txtAdvice_heavy);
        } else if (BMI < 20) {
          txtSuggest.setText(R.string.txtAdvice_light);
        } else {
          txtSuggest.setText(R.string.txtAdvice_average);
        }
      }
    };  // calcBMIListener
    btnCalcBMI.setOnClickListener(calcBMIListener);
  }
}
15. 點擊功能表【Run】→【Edit Configurations】設定執行時的組態如下圖:

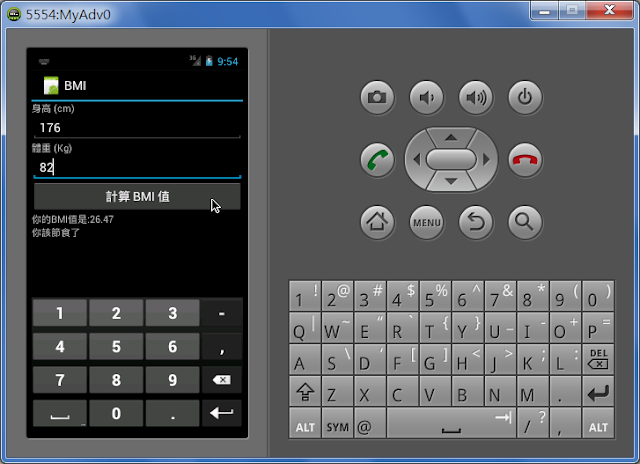
16. 點擊功能表【Run】→【Run MyActivity】,一切順利的話就會出現模擬器執行BMI App的模樣。
##
您可能也會有興趣的類似文章
- 方便的IntelliJ IDEA Markdown外掛idea-multimarkdown (0則留言, 2015/11/14)
- 使用IntelliJ IDEA學習Java程式設計 (IDEA #1) (0則留言, 2019/07/14)
- IntelliJ IDEA的專案結構、模組設定與執行時組態設定(IDEA教學 #6) (0則留言, 2019/08/17)
- 用IntelliJ IDEA的GUI Designer開發Swing程式 (0則留言, 2014/02/14)
- 如何在啟動IntelliJ IDEA idea64.exe時指定特定JDK (0則留言, 2015/11/14)
- 原來IntelliJ IDEA也有中文的網站 (0則留言, 2008/08/22)
- 用IntelliJ IDEA寫第一支Java程式;程式結構說明;Live Tempate用法(IDEA #4) (0則留言, 2019/08/09)
- 第一次執行IntelliJ IDEA與初始設定(IDEA #2) (0則留言, 2019/07/14)
- 由桌面啟動IntelliJ IDEA 14 64-bit執行檔 (0則留言, 2014/11/07)
- [Windows] IntelliJ IDEA自動偵測Windows Defender的排除資料夾設定 (2則留言, 2019/08/24)
- IntelliJ IDEA直接開啟專案的方法 (0則留言, 2010/06/03)
- 使用JUnit5測試程式的操作步驟 (IDEA教學 #10) (0則留言, 2019/08/31)
- Migration Guide: Eclipse ✈ IntelliJ IDEA (0則留言, 2015/07/07)
- IntelliJ IDEA Live Template(即時樣板)的使用與範例說明(IDEA #5) (0則留言, 2019/08/11)
- Java的資料型態與簡單的計算機程式 (IDEA #8) (0則留言, 2019/08/25)

讚!! 我目前正在把eclispe寫好得android搬過來中….