[Obs#67] upgit-使用GitHub圖床:快速上傳圖檔到GitHub並插入圖片網址到Obsidian
雖然這篇文章(影片)歸類到Obsidian,但介紹的upgit其實是一個通用的圖檔上傳工具,只要用一個命令就能把圖檔上傳到GitHub,並且直接取得GitHub的圖片鏈接網址,方便在筆記或Blog裡引用。
upgit有Windows、macOS與Linux等不同平台的版本。
由GitHub Releases裡下載不同平台的執行檔後,改名為upgit (例如將upgit_win_amd64.exe改為upgit.exe),將upgit.exe複製到PATH指向的資料夾。
Obsidian已經有一個Image Auto Upload外掛,使用PicGo在背景執行時,將貼入Obsidian的圖片自動上傳到GitHub儲存庫裡,想要節省操作步驟的朋友也可試用看看,但我個人覺得PicGo必須在執行狀態時才能上傳,整合性不如upgit方便。
最後面會介紹使用AutoHotkey的簡單合用方法,同時介紹使用Obsidian Shell Commands外掛自動上傳圖檔與插入GitHub圖片網址的操作步驟。
語法
upgit \[--target-dir TARGET-DIR] \[--verbose] \[--size-limit SIZE-LIMIT] \[--wait] \[--clean] \[--raw] \[--no-log] \[--output-type OUTPUT-TYPE] \[--output-format OUTPUT-FORMAT] FILE \[FILE ...]

Positional arguments:
  FILE                   local file path to upload. :clipboard for uploading clipboard image

Options:
  --target-dir TARGET-DIR, -t TARGET-DIR
                         upload file with original name to given directory. if not set, will use renaming rules
  --verbose, -V          when set, output more details to help developers
  --size-limit SIZE-LIMIT, -s SIZE-LIMIT
    .                                         in bytes. overwrite default size limit (5MiB). 0 means no limit
  --wait, -w             when set, not exit after upload, util user press any key
  --clean, -c            when set, remove local file after upload
  --raw, -r              when set, output non-replaced raw url
  --no-log, -n           when set, disable logging
  --output-type OUTPUT-TYPE, -o OUTPUT-TYPE
    .                                           output type, supports stdout, clipboard [default: stdout]
  --output-format OUTPUT-FORMAT, -f OUTPUT-FORMAT
    .                                           output format, supports url, markdown and your customs [default: url]
  --help, -h             display this help and exit
範例
upgit :clipboard -o clipboard -f markdown
upgit test1.png -f markdown
upgit test2.png -f markdown-simple
1. GitHub Token設定
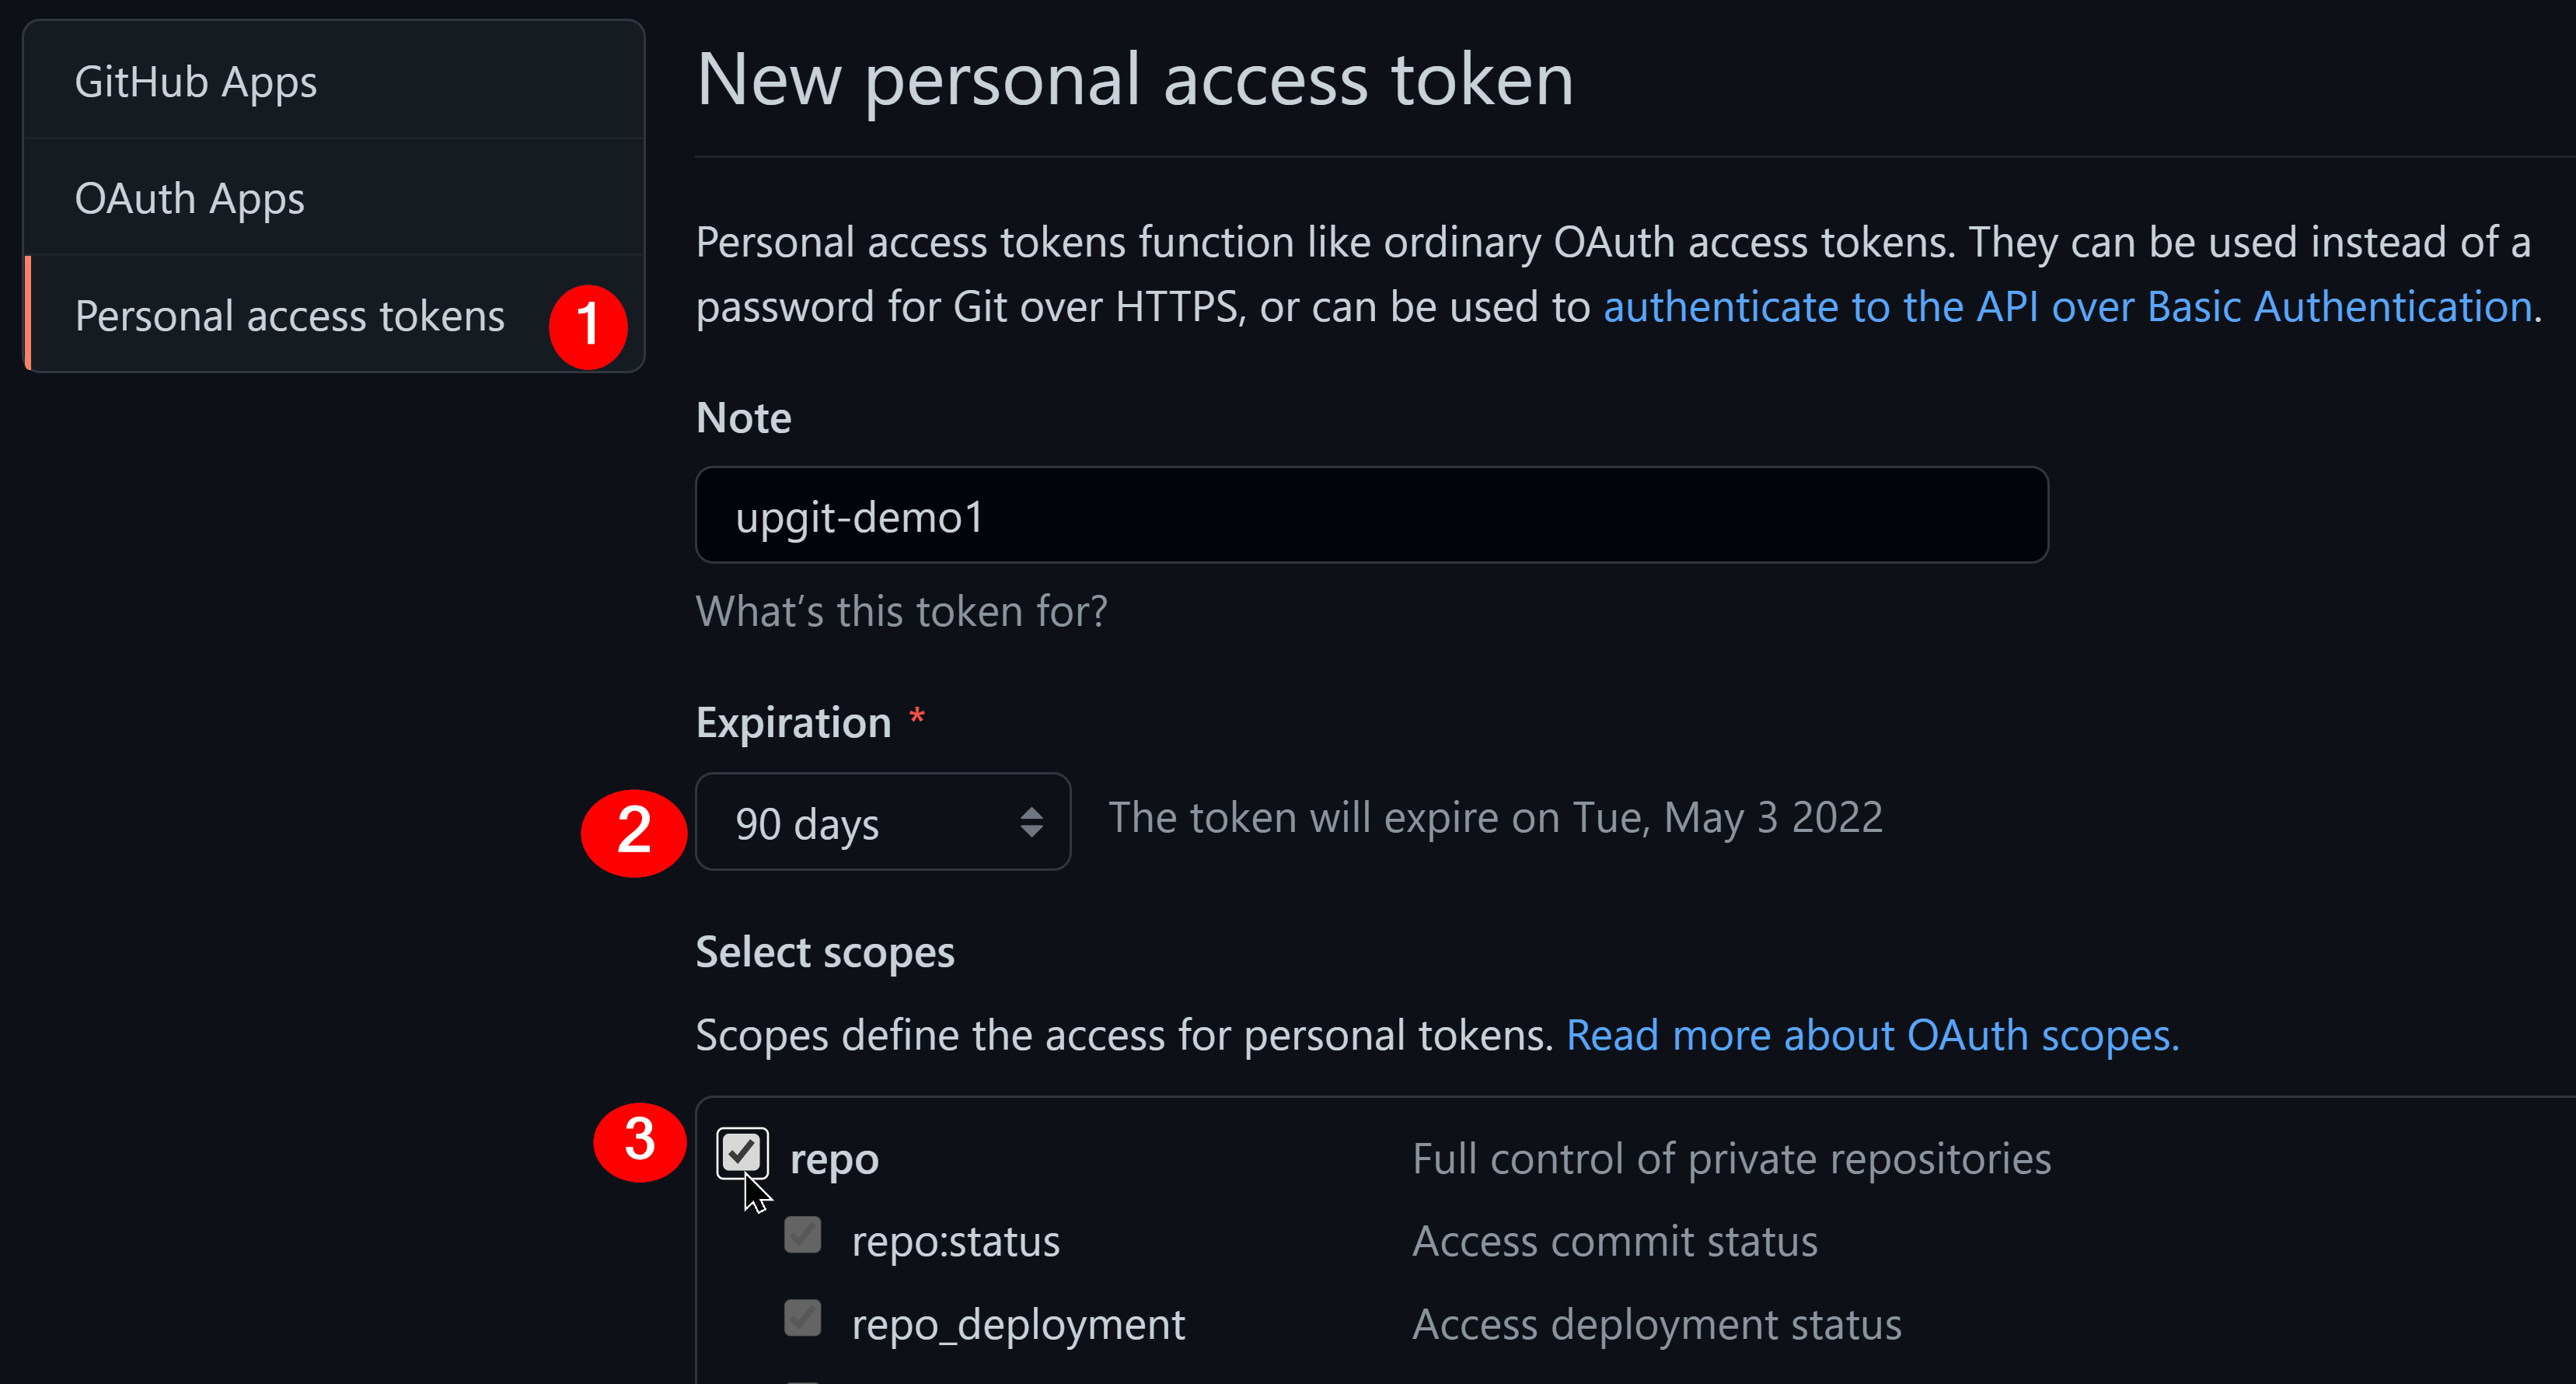
- 登入自己的GitHub→右上角頭像→【Settings】→左側拉到最底部→【Developer settings】→Personal access tokens→Generate new token
- 輸入【Note】、【Expiration】(有效期限),在【Select scope】勾選repo以取得儲存庫讀寫權限
- 在最下方點擊【Generate token】

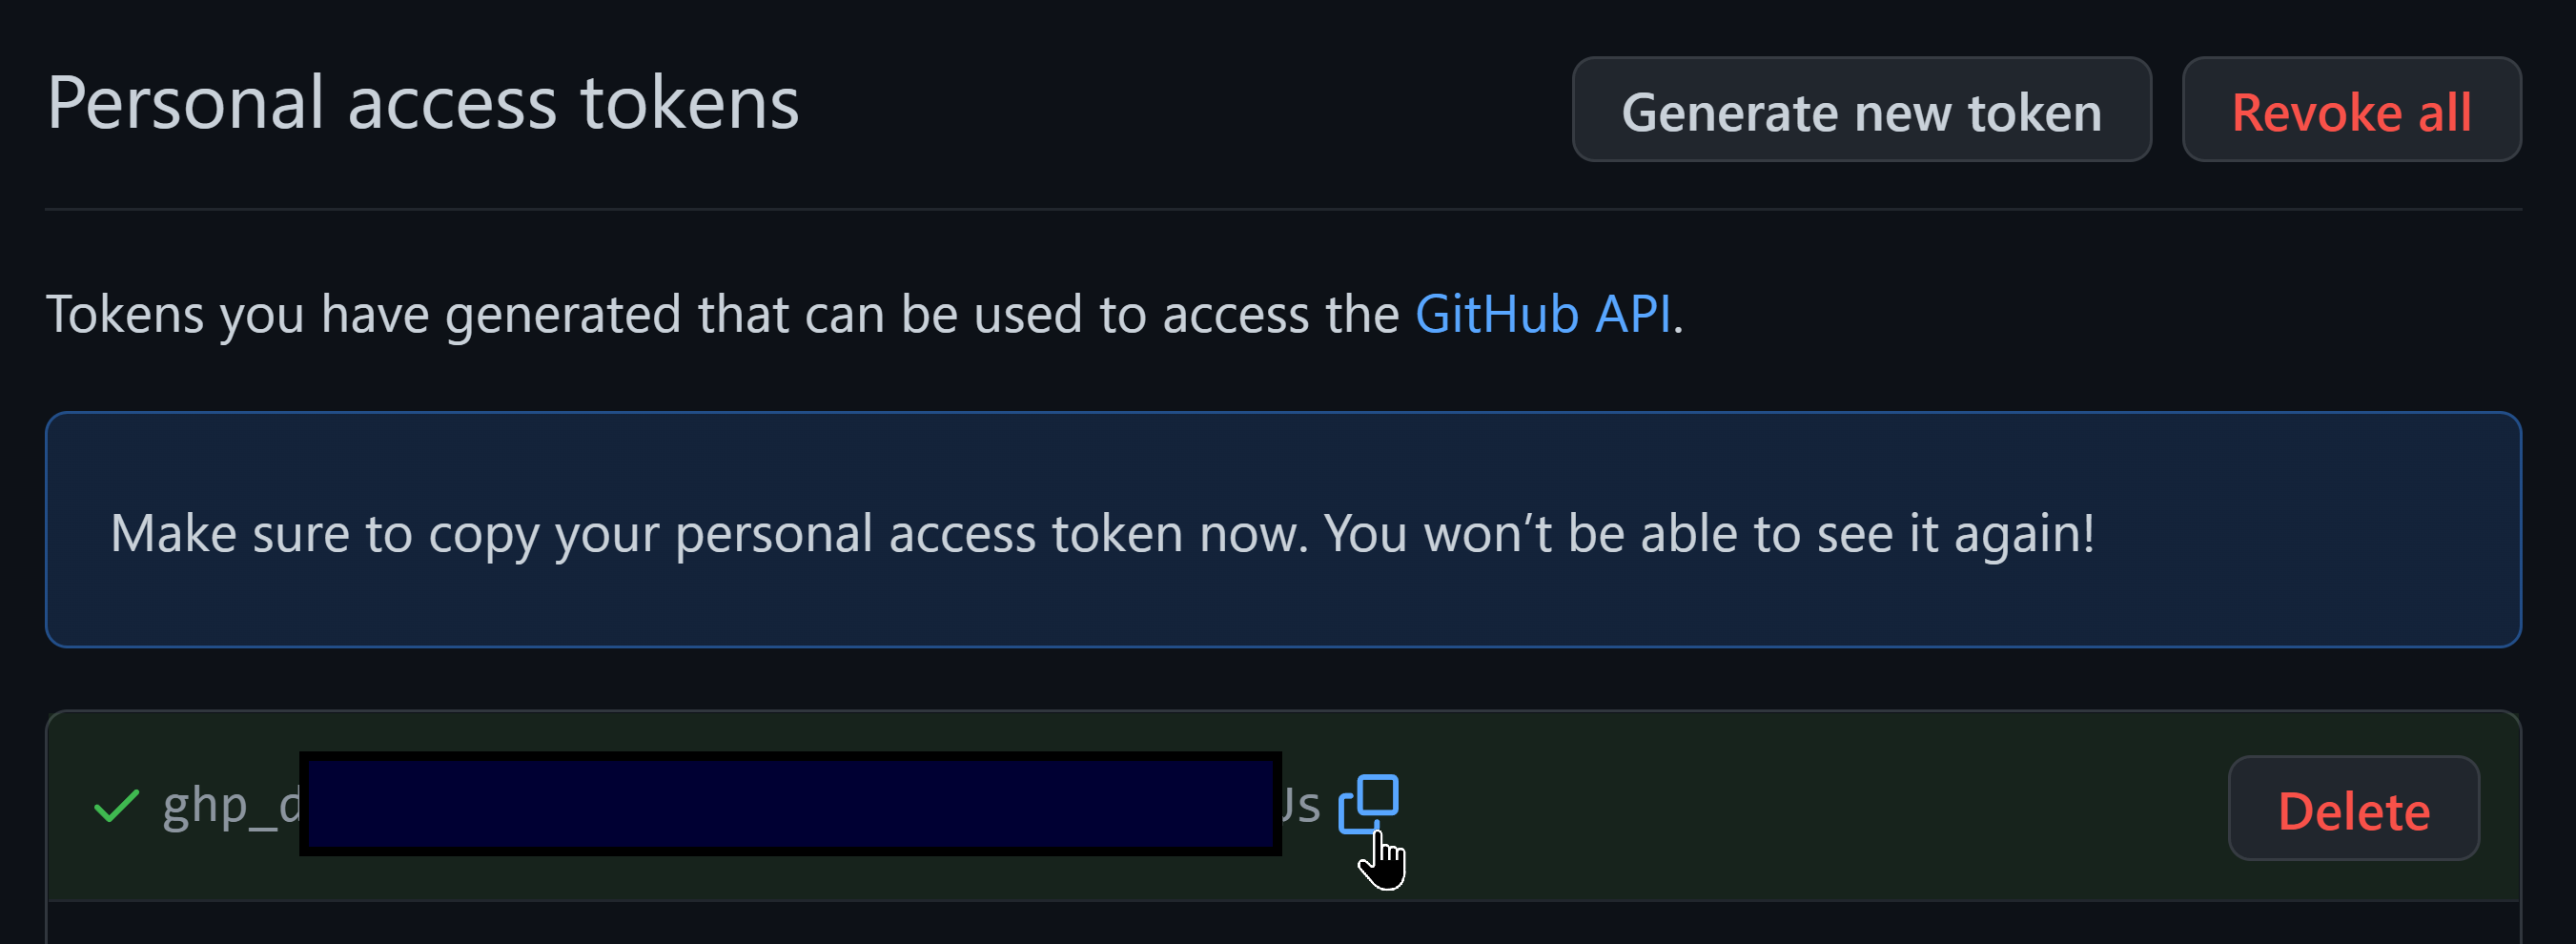
- 複製個人存取token:ghp_開頭全部字串

2. 建立專用的GitHub repo
【New repository】建立Public儲存庫。
3. upgit config.toml設定
設定檔config.toml和upgit在同一個資料夾,依據自己GitHub的設定修改內容,範例如下:
# 保存文件的分支,例如 master 或 main
# branch = "master"
# 您的拥有"repo"权限的Github令牌
# 获取Github Token连接: https://github.com/settings/tokens
pat = "ghp_U**********************************F"
# 上传文件名的格式模板
# / 目录分隔符, 作用: 是区分目录
# {year} 年份, 例如: 2022
# {month} 月份, 例如: 02
# {day} 天, 例如: 01
# {unix_ts} 时间戳, 例如: 1643617626
# {file_name} 原始文件名,如 logo (不含后缀名)
# {file_name_hash} {file_name}的 MD5 散列值
# {ext} 文件后缀名, 例如.png
# 下面的例子生成的文件名预览: 2022/01/upgit_20220131_1643617626.png
# 如果目录不存在将会被程序自动创建
rename = "{year}/{month}/upgit_{year}{month}{day}_{unix_ts}{ext}"
# 您的公共Github存储库的名称
# 注意: 为了让您和他人可以访问到图片资源, 您的Github仓库一定要是公开的,
# 在私有仓库中Github会拦截未授权的请求,你将会得到一个404.
repo = "your_repo"
# 请输入您的Gtihub用户名
username = "your_account"
# 如果您的网络访问Github异常或者缓慢,您可以尝试下面的配置以开启CDN加速
# [replacements]
# "raw.githubusercontent.com" = "cdn.jsdelivr.net/gh"
# "/master" = "@master"
# 自定义输出格式
# {url} 图片文件的网络URL地址
[output-formats]
"bbcode" = "[img]{url}[/img]"
"html" = '<img src="{url}"/>'
"markdown-simple" = ""
4. AutoHotkey整合
按〔Alt+V〕將剪貼簿內的圖片上傳到GitHub,並將GitHub圖片網址再插入剪貼簿。
!v::
  ;;Run d:\util\upgit.exe :clipboard -o clipboard -f markdown
  Run d:\util\upgit.exe :clipboard --output-type clipboard --output-format markdown
  return
5. 使用Obsidian Shell Commands外掛
- 安裝並啟用Shell Commands外掛
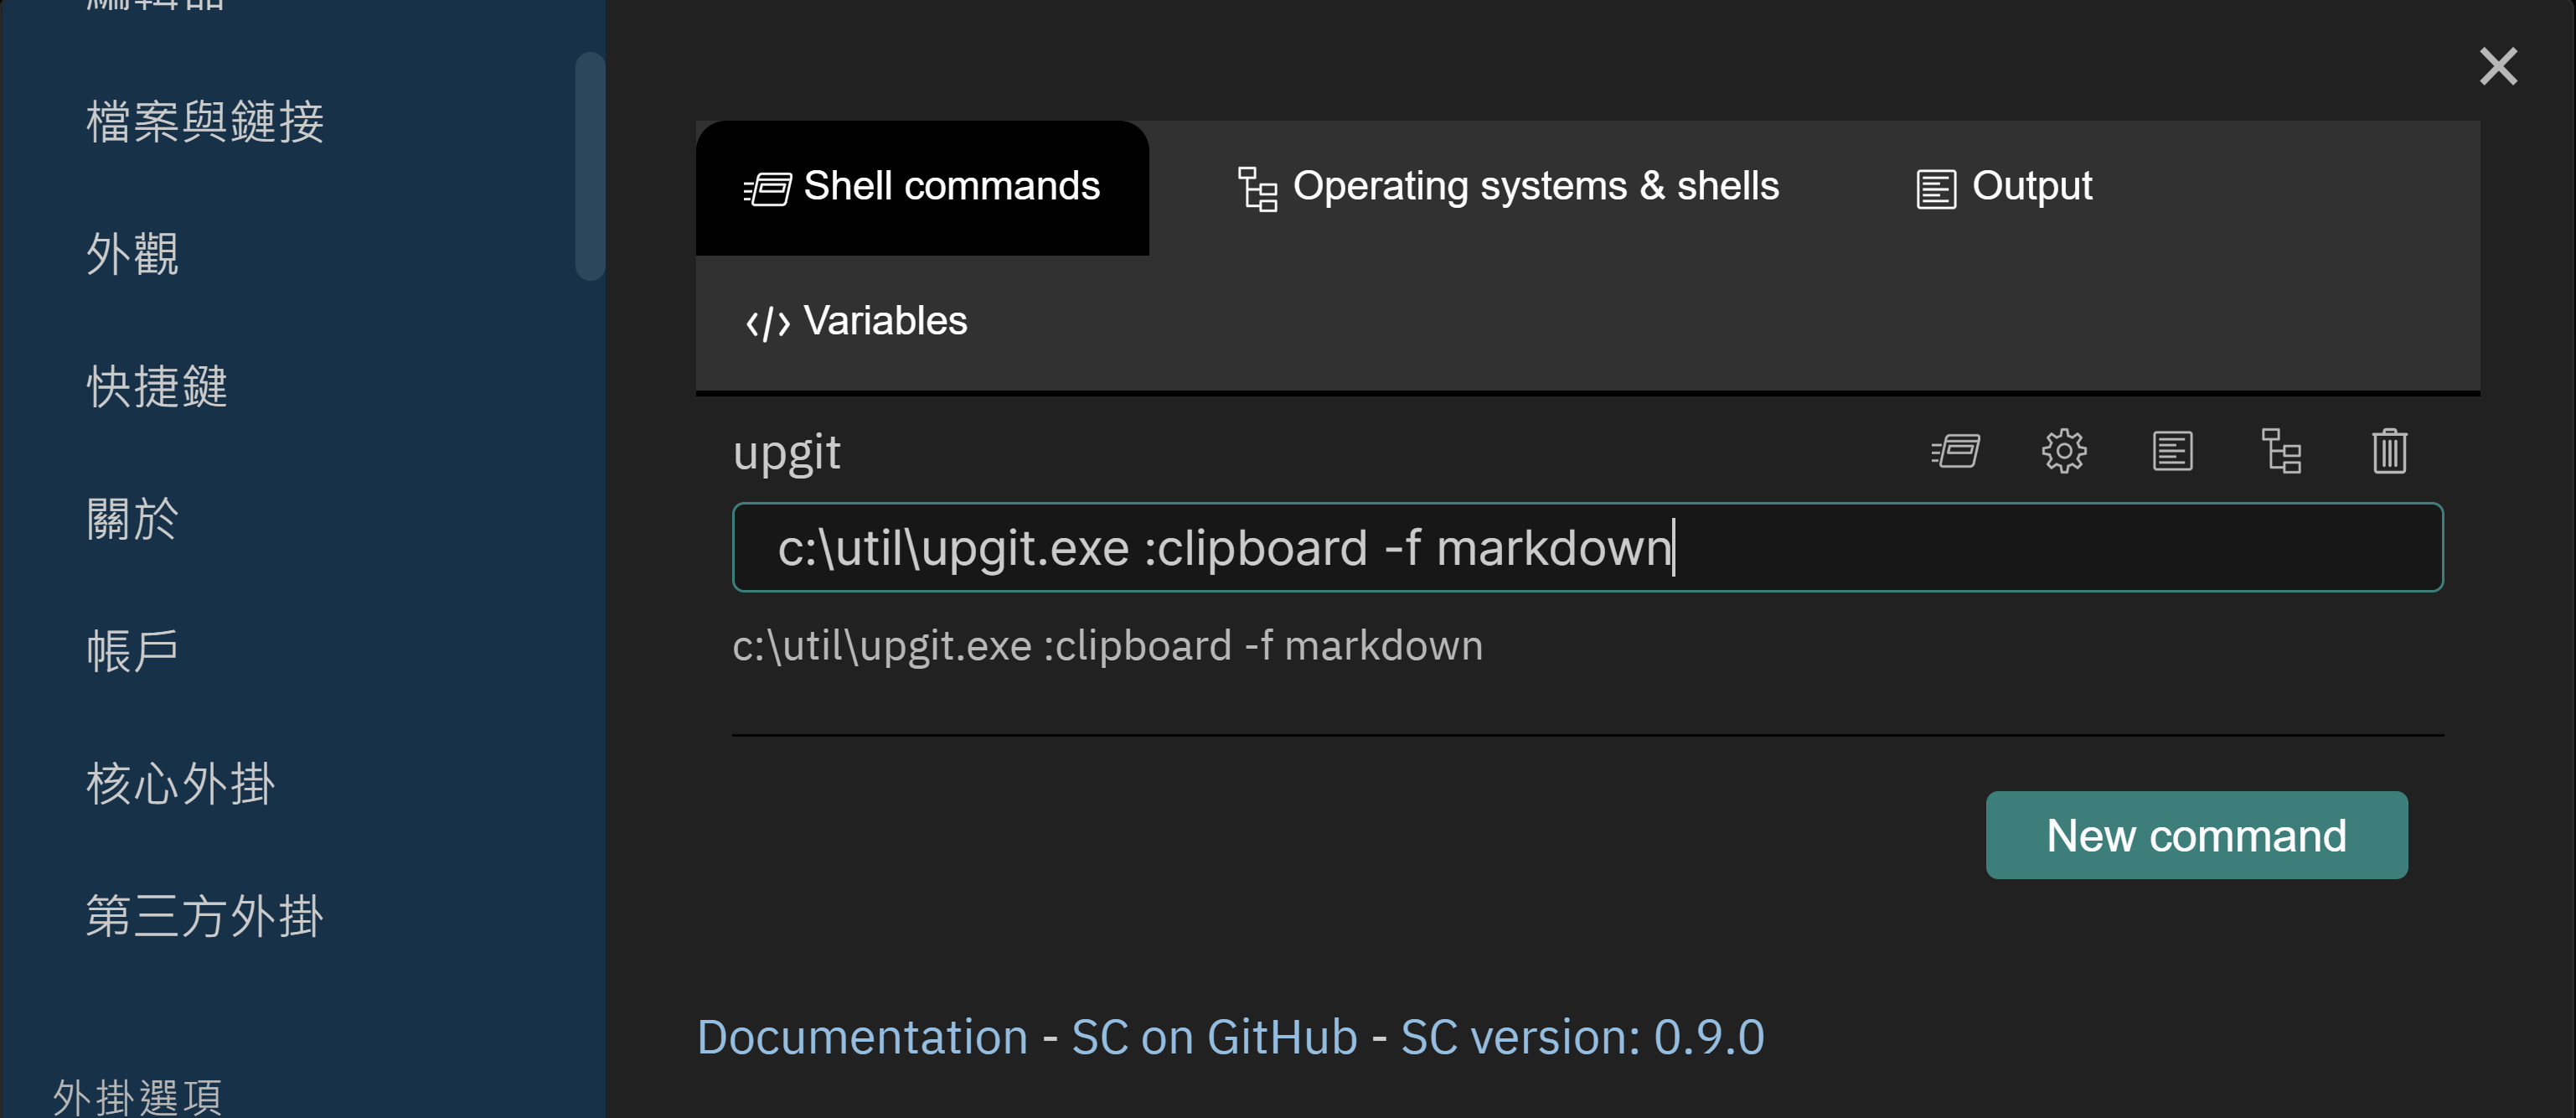
- 新增Shell命令
- 新的命令命名為upgit
- 命令內容:
upgit :clipboard -f markdown將系統剪貼簿內容上傳到GitHub,並將執行結果以markdown格式輸出到標準輸出(stdout)

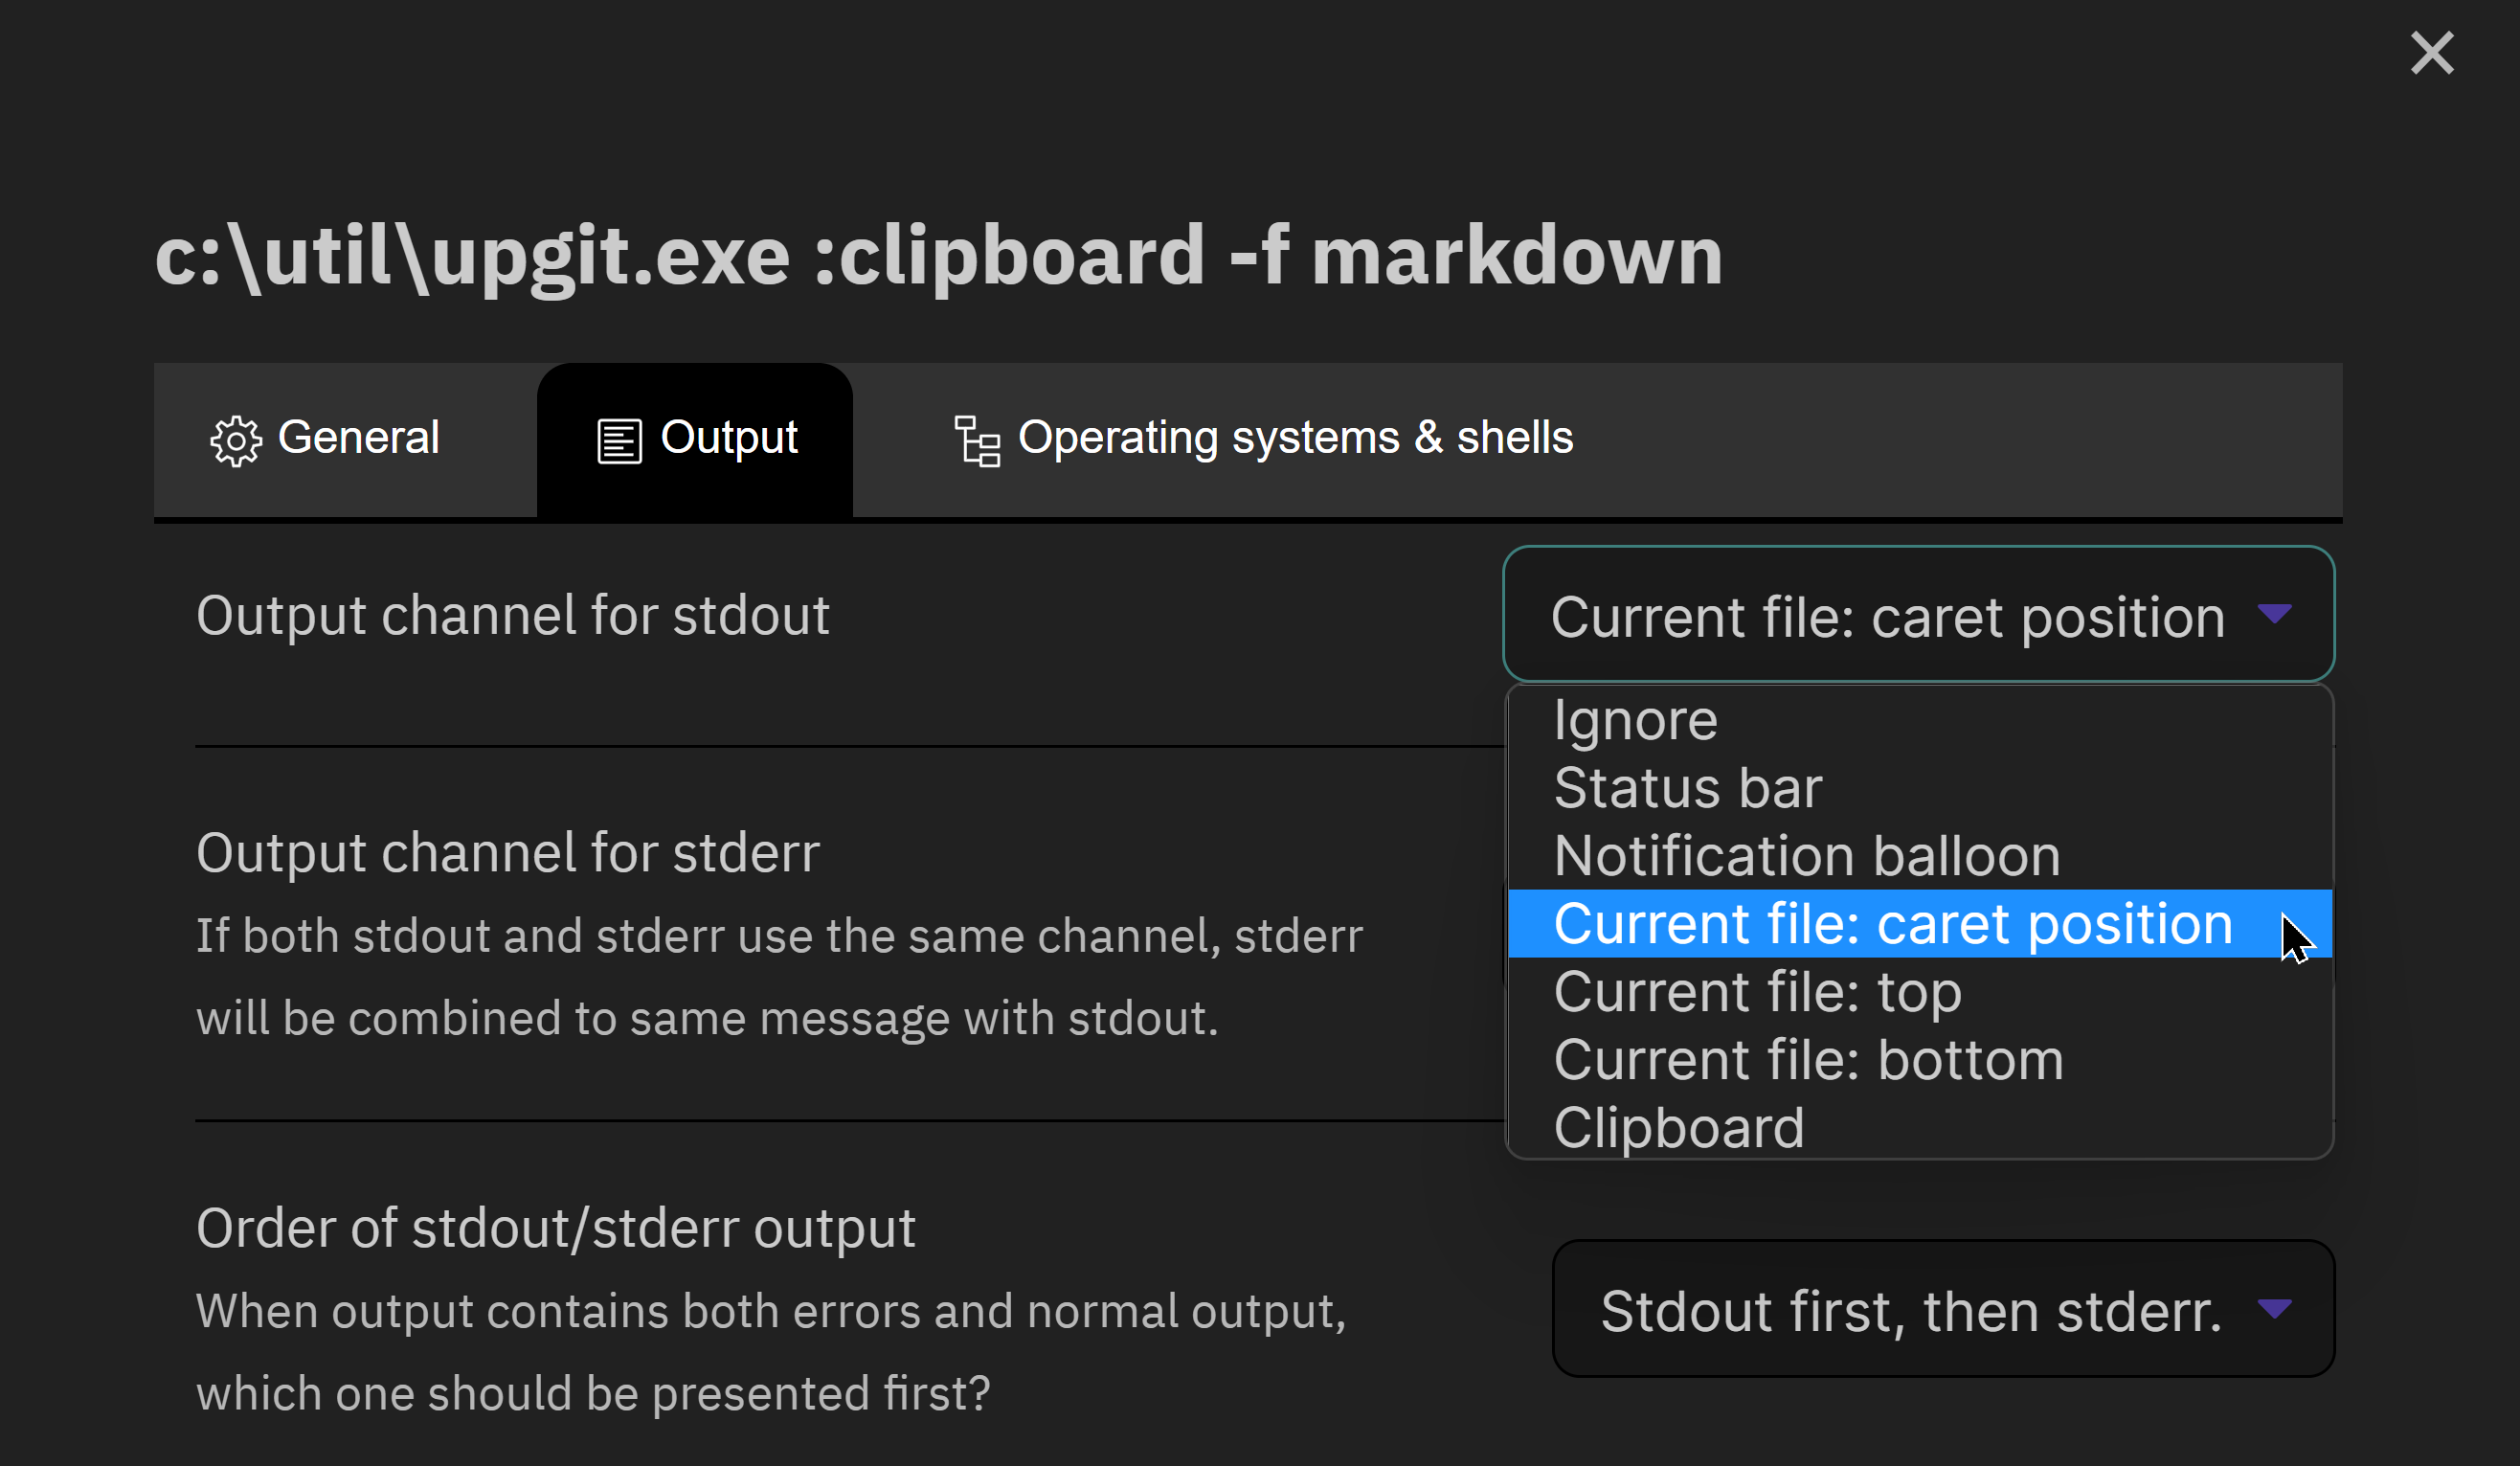
- Output選用輸出到目前檔案的游標位置,亦即將GitHub的圖片網址以Markdown格式插入目前游標位置

- 將
Shell commands: Exexcute upgit設置快捷鍵以方便快速操作
6. 相關鏈接
- upgit簡體中文說明
- pluveto/upgit: Another Typora image uploader
- Molunerfinn/PicGo: A simple & beautiful tool for pictures uploading built by vue-cli-electron-builder
7. 教學影片
%%
##
您可能也會有興趣的類似文章
- [Obs#110] 用Emo Uploader將GitHub用做圖床,方便發佈、分享 (0則留言, 2022/12/27)
- [Obs#86] 分享與編輯器相關的21個Obsidian外掛 (0則留言, 2022/05/08)
- [Obs#88] 綜合練習:快速設定的6種方法─使用8個Obsidian外掛 (0則留言, 2022/05/21)
- Obs131|Obsidian使用Dataviewjs動態查詢的嘗試 (0則留言, 2023/05/27)
- [Obs#12] Obsidian v0.8.4~v0.8.9的新增功能 (0則留言, 2020/09/06)
- [OBS#20] templater: 無限擴充可能的第三方樣板外掛 (1則留言, 2020/11/26)
- Obs126|Obsidian 2023/04 7個新外掛介紹與評析 (0則留言, 2023/04/29)
- Obs#117 | Obsidian表格攻略與表格就地編輯外掛:Table Enhancer (0則留言, 2023/03/19)
- Obs135|解鎖簡易Dataview查詢:驚人的SQL技巧,使用Query All The Things(QATT)外掛 (0則留言, 2023/08/19)
- Obsidian 1.0新手教學—打造個人知識管理利器,專屬的第二大腦 (2022年) (4則留言, 2022/10/22)
- [Obs#84] 另一個更簡便的筆記分欄作法:使用Columns外掛 (0則留言, 2022/04/30)
- [Obs#96] Obsidian分頁調整: CSS樣式與外掛,讓分頁操作更簡便 (0則留言, 2022/09/10)
- [Obs#56] 快速新增靈感/閃念筆記(Fleeting Note)的3種方法 (0則留言, 2021/10/10)
- [Obs#68] 利用QuickAdd巨集由IMDB建立影片檔案,用Minimal主題顯示成卡片 (0則留言, 2022/02/06)
- [Obs#26] Dataview外掛: 製作索引筆記利器;動態查詢筆記資料 (6則留言, 2021/02/19)


Sorry, 很久沒用Google sc…